Enabling SSL x.509 certificate to authenticate the members of a replica set
Instead of using simple plain-text keyfiles, MongoDB replica set or sharded cluster members can use x.509 certificates to verify their membership.
The member certificate, used for internal authentication to verify membership to the sharded cluster or a replica set, must have the following properties (Source:
https://docs.mongodb.org/manual/tutorial/configure-x509-member-authentication/#member-x-509-certificate) :
- A single Certificate Authority (CA) must issue all the x.509 certificates for the members of a sharded cluster or a replica set.
- The Distinguished Name (DN), found in the member certificate’s subject, must specify a non-empty value for at least one of the following attributes: Organization (O), the Organizational Unit (OU) or the Domain Component (DC).
- The Organization attributes (O‘s), the Organizational Unit attributes (OU‘s), and the Domain Components (DC‘s) must match those from the certificates for the other cluster members.
- Either the Common Name (CN) or one of the Subject Alternative Name (SAN) entries must match the hostname of the server, used by the other members of the cluster.
- If the certificate includes the Extended Key Usage (extendedKeyUsage) setting, the value must include clientAuth (“TLS Web Client Authentication”).
We have an existing setup of MongoDB 3.2.1 replica set running on three Ubuntu 14.04 VMs. The VMs are named as server2, server3 and server4. This mongodb replica set do not have authentication enabled. We are going to use this replica set and update it to use x.509 certificates for member authentication.
For this document I am going to use self-signed certificates, but self-signed certificates are insecure as we can’t trust the authenticity of the self-signed certificates. For our internal private setup, use we can use self-signed certificates.
First we will create our own CA (certificate authority) which will sign the certificates of our mongodb servers.
First I am going to create private key for my CA server.
openssl genrsa -out mongoPrivate.key -aes256

Next I will create the CA certificate:
openssl req -x509 -new -extensions v3_ca -key mongoPrivate.key -days 1000 -out mongo-CA-cert.crt
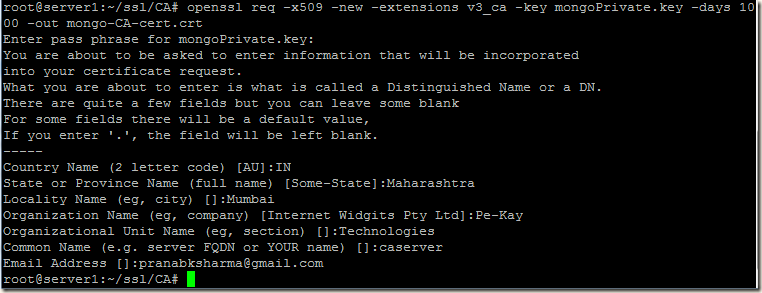
Our CA is ready to sign our certificates, now we will create private keys for our mongodb servers and will generate CSR (certificate signing request) files for each mongodb server. We will use the CA certificate that we created above and generate certificates for our mongod servers using the CSR files.
We will use a single command which will create the private key and CSR for a particular server. We have to create private key and CSR in all the mongodb server nodes. So we have three servers server2, server3 and server4 and we will run this command in all the three servers.
openssl req -new -nodes -newkey rsa:2048 -keyout server2.key -out server2.csr
While generating the CSR in our 3 servers, we will keep all fields in the certificate request same, except the Common Name. We will set the Common Name as hostname of that respective server on which we run the command.
We are using the
-nodes option, this will leave the private key unencrypted, so that we don’t have to type/enter/configure password while starting our MongoDB server.
Creating Private Key and CSR for server2:
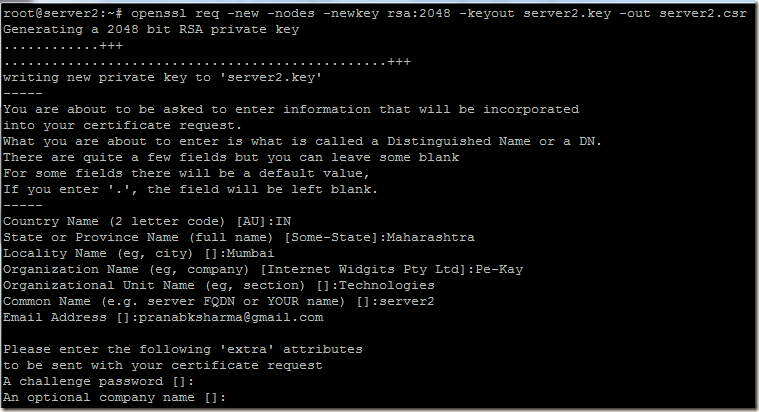
Now we will sign the server2’s CSR with our CA certificate and we will generate the public certificate of server2.
 Creating Private Key and CSR for server3:
 Creating Private Key and CSR for server4:

Generating certificates of server3 and server4:

Once certificates for all the three servers are generated, we will copy the server certificate and CA certificates to each server.
We have to concatenate the private key and the public certificate of a server into a single .pem file.
The cat command concatenates the private key and the certificate into a PEM file suitable for MongoDB.


Changes in MongoDB configuration file:
In all the three mongodb servers we have to add the below highlighted config options. For
PEMKeyFile and
clusterFile we have to use the respective .pem files of that server.
Config file in
server3:
net:
port: 27017
bindIp: 0.0.0.0
ssl:
mode: preferSSL
PEMKeyFile: /mongodb/config/server3.pem
CAFile: /mongodb/config/mongo-CA-cert.crt
clusterFile: /mongodb/config/server3.pem
security:
clusterAuthMode: x509
Explanation:
mode: preferSSL
Connections between servers use TLS/SSL. For incoming connections, the server accepts both TLS/SSL and non-TLS/non-SSL. For details please read
https://docs.mongodb.org/manual/reference/configuration-options/#net.ssl.mode
For the timebeing we are configuring SSL connection between our servers. The clients can connect to MongoDB server without TLS/SSL.
PEMKeyFile: /mongodb/config/server3.pemThe .pem file that we created using the private key and certificate of that particular server.
Note: We created unencrypted server’s private key, so we do not have to specify the
net.ssl.PEMKeyPassword option. If the private key is encrypted and if we do not specify net.ssl.PEMKeyPassword option then mongod or mongos will prompt for a passphrase.
CAFile: /mongodb/config/mongo-CA-cert.crt
This option requires a .pem file containing root certificate chain from the Certificate Authority. In our case we have only one certificate of CA, so here the path of the .crt file is specified.
clusterFile: /mongodb/config/server3.pem
This option specifies the .pem file that contains the x.509 certificate-key file for membership authentication. If we skip this option then the cluster uses the .pem file specified in the PEMKeyFile setting. In our case this file is same, so we may skip this option as our .pem file is same as the one we specified in PEMKeyFile setting.
clusterAuthMode: x509The authentication mode used for cluster authentication. Please visit the link
https://docs.mongodb.org/manual/reference/configuration-options/#security.clusterAuthMode for details.
Now we are ready to start the MongoDB servers of our replica set. After starting the mongod if we check the logs, we can see lines as shown below:
2016-02-24T10:20:39.424+0530 I ACCESS [conn8] authenticate db: $external { authenticate: 1, mechanism: "MONGODB-X509", user: "emailAddress=pranabksharma@gmail.com,CN=server2,OU=Technologies,O=Pe-Kay,L=Mumbai,ST=Maharashtra,C=IN" }
2016-02-24T10:20:40.254+0530 I ACCESS [conn9] authenticate db: $external { authenticate: 1, mechanism: "MONGODB-X509", user: "emailAddress=pranabksharma@gmail.com,CN=server4,OU=Technologies,O=Pe-Kay,L=Mumbai,ST=Maharashtra,C=IN" }
Seems the x.509 authentication for our replica set members are working

.
Now login to the primary of the replica set and create our initial user administrator using the localhost exception. For details of creating users you may read
http://pe-kay.blogspot.in/2016/02/update-existing-mongodb-replica-set-to.html and
http://pe-kay.blogspot.in/2016/02/mongodb-enable-access-control.html , I am not going to write about that in this post.
Enabling client SSL x.509 certificate authentication
Each unique x.509 client certificate corresponds to a single MongoDB user, so we have to create client x.509 certificates for all the users that we need to connect to the database. We can not use one client certificate to authenticate more than one user. First we will create the client certificates and then we will add the corresponding mongodb users.
While generating the CSR for a client, we have to remember the following points:
- A single Certificate Authority (CA) must issue the certificates for both the client and the server.
- A client x.509 certificate’s subject, which contains the Distinguished Name (DN), must differ from the certificates that we generated for our mongodb servers server2, server3 and server4. The subjects must differ with regards to at least one of the following attributes: Organization (O), the Organizational Unit (OU) or the Domain Component (DC). If we do not change any of these attributes, we will get error ("Cannot create an x.509 user with a subjectname that would be recognized as an internal cluster member.") when we add user for that client.
In the below screenshot I tried to create user for one of the client. In this case I created the client certificate keeping all the attributes same as the Member x.509 Certificate, except the Common Name. So I got the error:

So for my client certificate I am going to change the Organizational Unit attribute. For our mongodb server server2, server3 and server4 certificates, we generated CSR with
Organizational Unit as
Technologies, for client certificate I am going to use
Organizational Unit as
Technologies-Client. Also I am keeping the
Common Name as the name of the user
root (which going to connect to the database). All the remaining attributes in the client certificate CSR are kept same as the server certificate.

After that using the same CA as we did for our server certificates, we signed the client certificate CSR and generated our client certificate.

Then we concatenated the user’s private key and the public certificate and created the .pem file for that user.

Our client certificate is created, we have to add user in MongoDB for this certificate. To authenticate with a client certificate, we have to add a MongoDB user using the value of subject collected from the client certificate.
The subject of a certificate can be extracted using the below command:
openssl x509 -in mongokey/rootuser.pem -inform PEM -subject -nameopt RFC2253

Using the subject value
emailAddress=pranabksharma@gmail.com,CN=root,OU=Technologies-Client,O=Pe-Kay,L=Mumbai,ST=Maharashtra,C=IN we will add one user in the
$external database (Users created on the $external database should have credentials stored externally to MongoDB). So using the subject I created one user with root role in the admin database:
rep1:PRIMARY> db.getSiblingDB("$external").runCommand({
... createUser: "emailAddress=pranabksharma@gmail.com,CN=root,OU=Technologies-Client,O=Pe-Kay,L=Mumbai,ST=Maharashtra,C=IN",
... roles: [{role: "root", db: "admin"}]
... })

Our client certificate is created, corresponding user is created, we are ready to connect to mongodb using SSL certificate. For that first we have to change the value of ssl mode option from existing
preferSSL to
requireSSL in all our mongod server config files. This will make all the servers to accept only ssl connections.
net:
port: 27017
bindIp: 0.0.0.0
ssl:
mode: requireSSL
PEMKeyFile: /mongodb/config/server4.pem
CAFile: /mongodb/config/mongo-CA-cert.crt
If we change the
mode: preferSSL to
mode: requireSSL, and try to connect to mongod in usual way, we get the following error:
Error: network error while attempting to run command 'isMaster' on host '<hostname>:<port>'
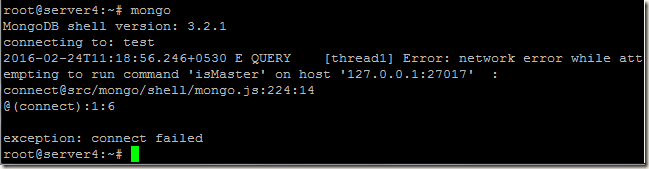
Now the client authentication needs x.509 certificates rather than username and password as we change the ssl mode to
requireSSL.
Lets connect to mongod using our client certificate:
mongo --ssl --sslPEMKeyFile ./mongokey/rootuser.pem --sslCAFile ./ssl/CA/mongo-CA-cert.crt --host server2
After getting connected, if we try to run any query, we get the following error:

As the user got root role and we connected to the admin database, it should be able to get the list of collections. What is the issue

???
If we run the connection status query, we can see that the authentication information is blank.
rep1:PRIMARY> db.runCommand({'connectionStatus' : 1})
{
"authInfo" : {
"authenticatedUsers" : [ ],
"authenticatedUserRoles" : [ ]
},
"ok" : 1
}
Well when our mongo shell connects to our mongod using ssl certificate as shown above, only the connection part is completed. To have authenticated, we have to use the
db.auth() method in the
$external database as shown below:
rep1:PRIMARY> db.getSiblingDB("$external").auth(
... { mechanism: "MONGODB-X509",
... user: "emailAddress=pranabksharma@gmail.com,CN=root,OU=Technologies-Client,O=Pe-Kay,L=Mumbai,ST=Maharashtra,C=IN"
... }
... )

Once we authenticated, we can run our queries and do admin tasks

.
Now say we have another client certificate with subject
emailAddress=pranabksharma@gmail.com,CN=reader,OU=Technologies-Client,O=Pe-Kay,L=Mumbai,ST=Maharashtra,C=IN and we connected to the database using this certificate. After getting connected we have to authenticate, so lets try to authenticate using another user(
emailAddress=pranabksharma@gmail.com,CN=root,OU=Technologies-Client,O=Pe-Kay,L=Mumbai,ST=Maharashtra,C=IN) , and we will get error:
Error: Username "emailAddress=pranabksharma@gmail.com,CN=root,OU=Technologies-Client,O=Pe-Kay,L=Mumbai,ST=Maharashtra,C=IN"
does not match the provided client certificate user "emailAddress=pranabksharma@gmail.com,CN=reader,OU=Technologies-Client,O=Pe-Kay,L=Mumbai,ST=Maharashtra,C=IN"

We have to authenticate with the same user, using which we connected to MongoDB server. We can’t use a different user’s certificate to connect to mongodb and later use a different user to authenticate.




 .
.


