Content switching:
Content switching feature of Netscaler allows it to distribute client requests across multiple servers based on the content that a client is accessing. When we configure content switching we specify which requests are to be directed to which virtual server. Typically a content switching configuration consists of a content switching virtual server, load balancing virtual servers with services and some content switching policies. To configure content switching, we have to configure a content switching virtual server and have to associate it with content switching policies and load balancing virtual servers.
In this document I will explain how to direct requests to different virtual servers based on content of the URL.
Scenario:
I have two physical servers 10.10.10.35 and 10.10.10.36. Both the servers are running two applications ERP and EF. ERP is running on port 9999 and EF is running on port 7777 in both the servers. I have to balance the load based on these two servers. The URLs published for these two applications are http://test.com/EF/ and http://test.com/ERP/ and I will use content switching based on the URL of the incoming request. The setup will be as follows:

Step 1:
I will add both the physical servers in Netscaler. Navigate to Servers under Load Balancing section in Netscaler console.

Click on Add button to add the servers.

Add name for the server and the IP address.

I added have both the servers 10.10.10.35 and 10.10.10.36 and named them as Solarex1 and Solarex2 respectively.
Step2:
Add all the services that I want to use. So I have to create four services, two for ERP application and two for EF application.
Navigate to Services under Load Balancing

Click on Add button to create new services

First I will create services for EF application running on both the servers Solarex1 and Solarex2 on port 7777.


Next I will create services for ERP application running on port 9999 in both Solarex1 and Solarex2 server.


Step3:
After services are created, I will create Load balancing virtual servers, one for EF and one for ERP application.
Navigate to Virtual Servers under Load Balancing

Click on Add button to create a virtual server

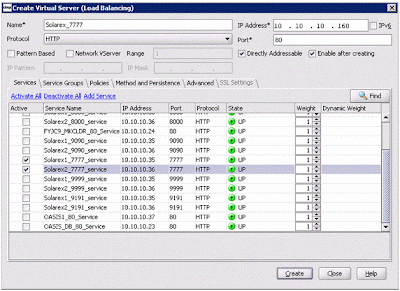
First I will create for EF application. I named it as Solarex_7777, gave IP 10.10.10.160, protocol HTTP and port 80. Select the two services Solarex1_7777_service and Solarex2_7777_service from the Services list and click on Create button to create the virtual server.
After that I will create the load balancing virtual server for ERP. . I named it as Solarex_9999, gave IP 10.10.10.161, protocol HTTP and port 80. Select the two services Solarex1_9999_service and Solarex2_9999_service from the Services list and click on Create button to create the virtual server.

Step4:
Next I will create the policies for content switching, which will drive client requests in to desired server.
Navigate to Policies under Content Switching

Click Add button to Add new policy

First I will create policy for EF application. Enter name for the policy, select Expression to create expression for this policy and click on Configure button

Click on Add button to add an expression in Create Expression window

In my case if the URL contains /EF/ then this policy will be applicable. Select Flow Type REQ, Protocol HTTP, Qualifier URL, Operator CONTAINS and value /EF/. Click on OK to generate this policy expression.

Now I can see the generated expression in the Expression area of the Create Expression window. Click on Create button to create the expression.

Click on Create in Content Switching Policy window to create the policy.

Same way we will create the policy Solarex_ERP for ERP application.
Step5:
In this step I will create the content switching virtual server and assign the policies into it.
Navigate to Virtual Servers under Content Switching

Click on Add button to create the new content switching virtual server

Enter a name for this Virtual server, IP address for this Virtual Server in my case it is 10.10.10.158, select HTTP protocol, and enter port 80. Select the two content switching policies that we created for EF and ERP, select respective target load balancing virtual server in the target column.

So all steps are done and our content switching setup is ready.
Let’s see how it looks

Suppose the live IP for my site test.com is 222.222.222.222. Imagine if a client requests for http://test.com/ERP/login.php page, let’s see how the request will reach the application. First the request will come to my firewall, in my firewall I have configured NAT to map my live IP 222.222.222.222 into my private IP 10.10.10.158 (which is the IP of the content switching virtual server). The content switching virtual server will receive the request and process the policies and will find that the URL contains /ERP/ and as per policy expression of Solarex_ERP and it should be forwarded to the target load balancing virtual server Solarex_9999 (IP 10.10.10.161). The load balancing virtual server Solarex_9999 will receive the request and it will apply the load balancing algorithm. As per the result of the load balancing algorithm it will forward the request into one of the two available services for ERP application.
Content switching feature of Netscaler allows it to distribute client requests across multiple servers based on the content that a client is accessing. When we configure content switching we specify which requests are to be directed to which virtual server. Typically a content switching configuration consists of a content switching virtual server, load balancing virtual servers with services and some content switching policies. To configure content switching, we have to configure a content switching virtual server and have to associate it with content switching policies and load balancing virtual servers.
In this document I will explain how to direct requests to different virtual servers based on content of the URL.
Scenario:
I have two physical servers 10.10.10.35 and 10.10.10.36. Both the servers are running two applications ERP and EF. ERP is running on port 9999 and EF is running on port 7777 in both the servers. I have to balance the load based on these two servers. The URLs published for these two applications are http://test.com/EF/ and http://test.com/ERP/ and I will use content switching based on the URL of the incoming request. The setup will be as follows:

Step 1:
I will add both the physical servers in Netscaler. Navigate to Servers under Load Balancing section in Netscaler console.

Click on Add button to add the servers.

Add name for the server and the IP address.

I added have both the servers 10.10.10.35 and 10.10.10.36 and named them as Solarex1 and Solarex2 respectively.
Step2:
Add all the services that I want to use. So I have to create four services, two for ERP application and two for EF application.
Navigate to Services under Load Balancing

Click on Add button to create new services

First I will create services for EF application running on both the servers Solarex1 and Solarex2 on port 7777.


Next I will create services for ERP application running on port 9999 in both Solarex1 and Solarex2 server.


Step3:
After services are created, I will create Load balancing virtual servers, one for EF and one for ERP application.
Navigate to Virtual Servers under Load Balancing

Click on Add button to create a virtual server

First I will create for EF application. I named it as Solarex_7777, gave IP 10.10.10.160, protocol HTTP and port 80. Select the two services Solarex1_7777_service and Solarex2_7777_service from the Services list and click on Create button to create the virtual server.

After that I will create the load balancing virtual server for ERP. . I named it as Solarex_9999, gave IP 10.10.10.161, protocol HTTP and port 80. Select the two services Solarex1_9999_service and Solarex2_9999_service from the Services list and click on Create button to create the virtual server.

Step4:
Next I will create the policies for content switching, which will drive client requests in to desired server.
Navigate to Policies under Content Switching

Click Add button to Add new policy

First I will create policy for EF application. Enter name for the policy, select Expression to create expression for this policy and click on Configure button

Click on Add button to add an expression in Create Expression window

In my case if the URL contains /EF/ then this policy will be applicable. Select Flow Type REQ, Protocol HTTP, Qualifier URL, Operator CONTAINS and value /EF/. Click on OK to generate this policy expression.

Now I can see the generated expression in the Expression area of the Create Expression window. Click on Create button to create the expression.

Click on Create in Content Switching Policy window to create the policy.

Same way we will create the policy Solarex_ERP for ERP application.
Step5:
In this step I will create the content switching virtual server and assign the policies into it.
Navigate to Virtual Servers under Content Switching

Click on Add button to create the new content switching virtual server

Enter a name for this Virtual server, IP address for this Virtual Server in my case it is 10.10.10.158, select HTTP protocol, and enter port 80. Select the two content switching policies that we created for EF and ERP, select respective target load balancing virtual server in the target column.

So all steps are done and our content switching setup is ready.
Let’s see how it looks

Suppose the live IP for my site test.com is 222.222.222.222. Imagine if a client requests for http://test.com/ERP/login.php page, let’s see how the request will reach the application. First the request will come to my firewall, in my firewall I have configured NAT to map my live IP 222.222.222.222 into my private IP 10.10.10.158 (which is the IP of the content switching virtual server). The content switching virtual server will receive the request and process the policies and will find that the URL contains /ERP/ and as per policy expression of Solarex_ERP and it should be forwarded to the target load balancing virtual server Solarex_9999 (IP 10.10.10.161). The load balancing virtual server Solarex_9999 will receive the request and it will apply the load balancing algorithm. As per the result of the load balancing algorithm it will forward the request into one of the two available services for ERP application.
জয় আই অসম,
প্রণব শর্মা
3 comments:
You should add the associated CLI Config if you have the chance.
Great Work Pranab!!!
Thanks
Rakesh Chandela
Nicely explained
Post a Comment