CopyDisable

Showing posts with label Mysql. Show all posts

Monday, 13 May 2024

MySQL 8 silent installation on Windows 11

In this post I am going to show you how to install MySQL 8.* version on a windows 11 machine. For this post I am going to use MySQL 8.4 version.

Open windows Command Prompt with administrative privileges. 

Step 1: To install MySQL 8.4 version, we need to have visual studio 2019 x64 redistributable installed in our Windows 11 machine. So first we will install this prerequisite: 

Download visual studio 2019 x64 redistributable from the URL:

https://download.visualstudio.microsoft.com/download/pr/c7707d68-d6ce-4479-973e-e2a3dc4341fe/1AD7988C17663CC742B01BEF1A6DF2ED1741173009579AD50A94434E54F56073/VC_redist.x64.exe

Install visual studio 2019 x64 redistributable silently from the command prompt:

VC_redist.x64.exe /q /norestart


Step 2: Create MySQL data directory, in this directory MySQL database going to reside:

mkdir C:\ProgramData\MySQL\Data


Step 3: Create a directory to store MySQL config file:

mkdir C:\ProgramData\MySQL\Config


Step 4: Create mysql.ini config file inside C:\ProgramData\MySQL\Config folder:


[client]

port=3306

[mysql]

no-beep

[mysqld]

port=3306

datadir=C:/ProgramData/MySQL/Data

default-storage-engine=INNODB

lower_case_table_names=1


Step 5: Install MySQL silently 

mysql-8.4.0-winx64.msi /qn INSTALLDIR="C:\Program Files\MySQL"


Step 6: Create MySQL Windows Service:

"C:\Program Files\MySQL\bin\mysqld" --install MySQL --defaults-file=C:\ProgramData\MySQL\Config\mysql.ini


Step 7: Initialize MYSQL

"C:\Program Files\MySQL\bin\mysqld" --defaults-file=C:\ProgramData\MySQL\Config\mysql.ini  --initialize-insecure


Step 8: Add MySQL Path to environment variable:

setx /M PATH "%PATH%;C:\Program Files\MySQL\bin"


Step 9: Start MySQL service:

net start MySQL


We can add the above commands in a script and run that script as admin user to make this installation completely silent. 

Wednesday, 7 January 2015

Linux Out of Memory Process Killer

Linux OS has an Killer….. Oooopppssss…. don’t afraid…. its just the "Out of Memory" killer facility which kills running processes when the system runs out of free memory. When the Linux system runs out of memory then the kernel starts killing processes in order to stay operational. The Linux kernel uses a mechanism called Out Of Memory Killer (or OOM Killer) for recovering memory on the system and overcome memory exhaustion.

In one of my server running LAMP stack sometimes MySQL server was getting terminated abruptly. Actually MySQL was getting killed by the OOM killer. MySQL memory pools were optimized but actually the server physically had low memory and there was no possibility of increasing memory of the server. I could afford other processes (like Apache) getting killed but have to prevent MySQL database server from getting killed.

Normally Linux OOM killer treats all processes equally, but there is a way to control the behavior of OOM Killer. Each Linux process has a OOM score assigned to it. Whenever system is about to run out of memory, OOM killer terminates the program with the highest score.

One way is to adjust the value of the file /proc/[process_id]/oom_adj (since Linux kernel 2.6.11). The valid range is –16 (very unlikely to be killed by the OOM killer) to 15 (very likely to be killed by the OOM killer) and a value of –17 exempts a process entirely from the OOM killer.

So we can do as root user:
# echo –17 > /proc/MySQL_Process_ID/oom_adj
to keep MySQL process out of reach of the OOM killer.

Since Linux 2.6.36, use of the file /proc/[process_id]/oom_adj  is deprecated in favor of the file /proc/[process_id]/oom_score_adj
The range of values which oom_score_adj accepts is from integer -999 (very unlikely to be killed by the OOM killer) up to 1000 (very likely to be killed by the OOM killer) and a value of –1000 exempts a process entirely from the OOM killer.

So in this case we have to set:
# echo -1000 > /proc/MySQL_Process_ID/oom_score_adj
to prevent MySQL getting killed.
 
But above two techniques are temporary, whenever we restart MySQL or 
the Server the Process ID of MySQL process changes and again we have to run the above command.
To permanently exempt MySQL from getting killed, we can edit the MySQL service’s upstart script file 
/etc/init/mysql.conf and add the parameter 
oom score 
The value of this parameter can be an integer ranging -999 (very unlikely to be killed by the OOM killer) to 1000 (very likely to be killed by the OOM killer). It may also have a special value never which instructs the OOM killer to ignore this process entirely.


So for my MySQL database server running on Ubuntu 12.04, I edited the upstart script /etc/init/mysql.conf and added the line:

oom score never


After that restart MySQL service and its done :) .

Lets check the values that /proc/MySQL_Process_ID/oom_score_adj and /proc/MySQL_Process_ID/oom_adj files have after setting oom score never


Yeppp… it is as expected :) :) :) 

Friday, 2 May 2014

Optimizing MySQL queries with memory tables

In this query optimization tip, I will show you how we can make our queries faster using MySQL’s memory storage engine.

I have some report queries in my call center application (using which we capture the calls that we received in our call center).

The main table to be used was callflow:

image

I have to calculate some stats from this table, like the total duration of the call.

image

One of the report query was:

select date(receivedon), sum(TIME_TO_SEC(TIMEDIFF(finishedon,receivedon))) Total, count(rcv_call_id) No_of_calls,
max(TIME_TO_SEC(TIMEDIFF(finishedon,receivedon))) maximum ,
min(TIME_TO_SEC(TIMEDIFF(finishedon,receivedon))) Minimum
from
(select FkCallID rcv_call_id, receivedon from callflow where FlowType='R' and
ReceivedOn >= '2014-01-01 00:59:03' and
ReceivedOn <= '2014-01-31 00:59:03') rcv,
(select FkCallID clsd_call_id, finishedon from callflow where FlowType='C' and
FinishedOn >= '2014-01-01 00:59:03' and
FinishedOn <= '2014-01-31 00:59:03') clsd where rcv_call_id=clsd_call_id group by date(receivedon);

This query returns total number of calls for a day, total time in seconds for the calls, max time taken for a call and min time taken for a call.

image

This query was taking around 30 seconds to execute which is too much.

So I decided to use MySQL’s memory tables for above query. The above query has two derived tables and I am going to use memory tables for those two derived tables.


1) First I will create the memory tables for the derived tables and going to add index on the column which will be used in where condition.

CREATE TABLE rcv ENGINE=MEMORY
SELECT FkCallID rcv_call_id, receivedon from callflow  where  FlowType='R' and
ReceivedOn >= '2014-01-01 00:59:03' and
ReceivedOn <= '2014-01-31 00:59:03' ;

ALTER TABLE rcv ADD INDEX (rcv_call_id);
 
CREATE TABLE clsd ENGINE=MEMORY select FkCallID clsd_call_id, finishedon from callflow  where FlowType='C'  and
FinishedOn >= '2014-01-01 00:59:03' and
FinishedOn <= '2014-01-31 00:59:03';

ALTER TABLE clsd ADD INDEX (clsd_call_id);


2) Using these memory tables, I will rewrite the query:


select date(receivedon), sum(TIME_TO_SEC(TIMEDIFF(finishedon,receivedon))) Total, count(rcv_call_id) No_of_calls,
max(TIME_TO_SEC(TIMEDIFF(finishedon,receivedon))) maximum ,
min(TIME_TO_SEC(TIMEDIFF(finishedon,receivedon))) Minimum
from rcv, clsd where rcv_call_id=clsd_call_id group by date(receivedon);


3) After running the query and getting the result, I will drop the temporary memory tables:

drop table rcv;
drop table clsd;


My query after using the memory tables gave results in 87 ms which is lightning fast compared to 30 secs it was taking previously with derived tables.

But remember to adjust the max_heap_table_size system variable, as this value restrict the maximum size of memory tables. Default is 16MB, so adjust it as per your need to take the benefit of memory tables.

Tuesday, 12 November 2013

MySQL Auditing

I got a task of auditing user activities for some sensitive database in one of our MySQL database servers. Auditing user activity was a tough task with earlier version of MySQL. We had to go through the slow query log or general log and find out our required data from these two files by scanning through lots of data. Which is obviously not a trivial task. But MySQL started supporting plugin API since MySQL 5.1 version and that changed the game. That leads to the arrival of MySQL AUDIT Plugin, which is a MySQL plugin from McAfee and this plugin provides audit capabilities for MySQL.

So in this example I will show you how to audit user activities like update,delete,drop,truncate for a particular database say okcl_sets_app. For this example I have used Ubuntu 12.04 with MySQL 5.5.24.

First I will show you how to install the plugin and then auditing some user activity without restarting the MySQL server.

Download the MySQL Audit plugin for your version of MySQL from the links provided in the page https://github.com/mcafee/mysql-audit/downloads

image

We have to copy the plugin file into MySQL’s plugin directory. To find the location of the plugin directory we can use the following command:

image

The plugin file is available in the zip binary distribution. Extract the zip file

# unzip audit-plugin-mysql-5.5-1.0.3-371-linux-i386.zip
image

The actual plugin file is inside of the lib folder of the extracted zip folder. Copy the plugin file (libaudit_plugin.so) into MySQL’s plugin directory.

# cp ./audit-plugin-mysql-5.5/lib/libaudit_plugin.so /usr/lib/mysql/plugin

Once the plugin file is copied, we can install the plugin using the following command:

image

Note: The above command requires INSERT privilege for the mysql.plugin table.

The INSTALL PLUGIN command loads and initializes the plugin and makes the plugin available for use. So there is no need to restart the MySQL server.

We may also install this plugin by inserting the following line

plugin-load=AUDIT=libaudit_plugin.so

in the [mysqld] section of MySQL configuration file. But this will require MySQL server restart to load the plugin.

To check whether the plugin has been installed and loaded successfully, we can use the SHOW PLUGINS command and check the line for AUDIT plugin.

image

We can find the version of our loaded audit plugin using the following command:

image

Our audit plugin is installed and loaded successfully, now we can see the default values for the configuration system variables of the audit plugin:

image

Audit plugin writes the auditing activities in JSON format. It supports writing auditing activities directly to a file, or to a unix socket.

Now I will enable JSON file auditing using the dynamic system variable.
audit_json_file: json log file Enable|Disable (1|0)

image

By default the plugin creates mysql-audit.json file inside MySQL datadir and writes audit trail to this file. We can change the file name and location by changing the audit_json_log_file system variable.

After enabling auditing, the plugin starts auditing all the user activities on the server, which will be large amount of data. We may restrict auditing data by specifying the commands that are to be audited and also we can specify the database/table that we need to audit.

As per my requirement I have to audit update,delete,drop,truncate for the database  okcl_sets_app

For that I will first specify the commands that are to be audited by changing the audit_record_cmds system variable.

image

Next I will specify the object(s) that I need to audit by changing the audit_record_objs system variables.

image

All done, we can check the audit settings whether everything is changed as per our requirement

image

Note: To make our audit configurations to persist across MySQL restart, add the required audit plugin system variables into the [mysqld] section of MySQL configuration file.

All the Audit Plugin’s system variables are available in this page: https://github.com/mcafee/mysql-audit/wiki/Configuration

Now I will update the table named TableName1 in okcl_sets_app database and lets see what we get in the Audit log file

image

Wow, wealth of information that we can collect transparently Smile .

Tuesday, 13 August 2013

Automated MySQL database backup restoration


Introduction:

Mainly we use mysqldump to take backups of our MySQL database servers. Although mysqldump is very reliable but we need to make sure that backup should be restorable when it really matters. So there should be some backup verification process. As per this process we need to download latest database mysqldump backups from our MySQL database servers and restored it to some test server regularly after some days of interval. This activity is used to verify the integrity and reliability of the backups that are getting generated. Previously this activity was manual and it was taking human working hours to monitor and account/report the restoration activity. My task was to automate this activity and generate report of this activity for later analysis.


Platform:

We use MySQL 5.5 for our database engine on Ubuntu 12.04 64bit edition.


Technologies/Tools Used:

MySQL 5.5, PHP 5.3 scp, bzip2, shell scripting on Ubuntu 12.04


The Task:

It consists of two components:

1) A Shell script and a PHP script to do the restoration and statistics generation

2) A small reporting PHP-MySQL web application to generate reports from the gathered statistics.

Restoration and statistics generation

A normal OS user (stgsync) is created in all the database servers and in the backup testing server. The shell script will use this user to connect to a database server to download the latest backup using Linux’s builtin scp tool.clip_image003

After the backup file is downloaded, it is decompressed.

Before restoring the decompressed MySQL backup, MySQL database server in the Backup Testing Server will be cleaned up (removing all the existing data and log files).

MySQL server is cleaned up and restarted after that the decompressed mysqldump backup file is restored.

If restoration is successful, a PHP script will be called to generate statistics from the restored databases, these statistics are added to a centralized MySQL report database.

Restoration log will be mailed to the concerned people.
clip_image005

Backup Restoration Report Generation

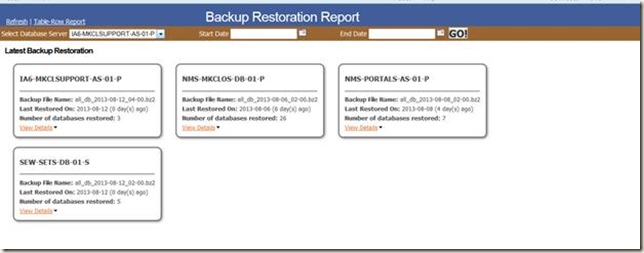
When we open the home page of the report application, we can see when the last restoration took place for a particular MySQL database server.
clip_image007

In the above screenshot we can see last restoration information for the four configured database servers:

1) Restoration of the backup for the server IA6-MKCLSUPPORT-AS-01-P took place on 2013-08-12 and the name of the backup file is all_db_2013-08-12_04-00.bz2

2) Restoration of the backup for the server NMS-MKCLOS-DB-01-P took place on 2013-08-06 and the name of the backup file is all_db_2013-08-06_02-00.bz2

3) Restoration of the backup for the server NMS-PORTALS-AS-01-P took place on 2013-08-08 and the name of the backup file is all_db_2013-08-08_02-00.bz2

4) Restoration of the backup for the server SEW-SETS-DB-01-S took place on 2013-08-12 and the name of the backup file is all_db_2013-08-12_02-00.bz2

We can see the details of the latest backup restoration for a server, click on View Details

clip_image009

We can see the statistics of the restoration like how many table are restored, how many views are restored, how many procedures are restored etc.

clip_image010

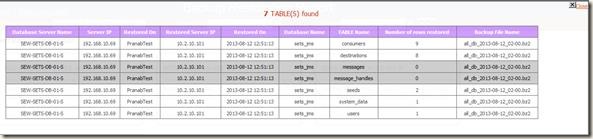
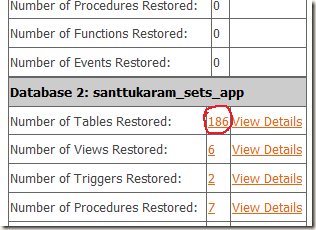
Now to get more information about different restored items, say I need to check which tables are restored for a particular database, click on the number of tables restored.
clip_image011

I can get the table names and number of rows restored. Here the tables with 0 rows restored are shown in dark color.

clip_image013

To find which views are restored, click on the number of views for a database

clip_image014

clip_image015

Same way we can view the functions, procedures and events restored for a particular table.

Also we can get the detailed information by clicking View Details link

clip_image016

clip_image018

Now say we want to compare backup restorations reports for a particular database server, so that we are sure that backups are happening properly (by checking number of objects restored, number of tables and rows restored).

For that we have to find out when the previous backup restorations took place for a particular period

clip_image020

Select the database server name and select the backup restoration period (selecting a Start date and End date) and click on Go button.

For example we will find out when backup restoration took place for the server IA6-MKCLSUPPORT-AS-01-P from 1st of August 2013 and 13th of August 2013. After searching we could see that backup restoration took place 5 times.

clip_image022

Say we want to compare backup restoration that took place on 13-08-2013 and 12-08-2013. Click on View Details links for both backup restoration records. Here we can see how many different objects are restored for each database.

clip_image024

Now say we want to compare table restoration for the database redmine_ajitj, click on the number of tables restored for both restoration reports.

clip_image026

So we can see the number of rows restored for each table and now we can compare J. In this example we can see the latest backup restored lesser number of rows than the previous backup. There may be some issue or may be the application owner had cleaned up some data, so it needs some attention.

clip_image028

Also if required I can generate Table-Row report (restoration report of tables and number of rows for a particular server, database or table). For this type of report click on Table-Row Report link.

clip_image030

Here we can generate report as per our requirement. I will show you three possibilities.

1) We want Table and number of rows restoration report for a particular database server.
e.g. We will generate report for the server NMS-MKCLOS-DB-01-P
Select the Database server name, in Select Database Name list, leave it as --All Databases-- and in Select Table Name list keep --All-Tables-- . Select the report period by selecting Start Date and End Date.
clip_image032

Click on Go button to generate the report
clip_image034

2) We want to generate report for a particular database within a database server
e.g. We will generate report for the survey database in server NMS-MKCLOS-DB-01-P.
Select the Database server name NMS-MKCLOS-DB-01-P, in Select Database Name list select survey and in Select Table Name list select --All-Tables--. Select the report period by selecting Start Date and End Date.
clip_image036
Click on Go button to generate the report
clip_image038

3) In last report type, we can get restoration report for a particular table within a database.
e.g. We will generate report for the table survey_answer of the database survey in server NMS-MKCLOS-DB-01-P
Select the Database server name NMS-MKCLOS-DB-01-P, in Select Database Name list select survey and in Select Table Name list select survey_answer . Select the report period by selecting Start Date and End Date.
clip_image040
Click on Go button to generate the report
clip_image042


Conclusion:

This automation will save lots of human resource hour which was previously being wasted in database backup restoration, verification and reporting tasks. Also this will help us to find errors/issues in database backups and to find out inconsistent backups.

Monday, 11 March 2013

Encrypting MySQL dump


For one of my MySQL databases, I needed to encrypt the MySQL dump files that I used to take for backup of that database. The reason was that the database contained some sensitive information and I did not want to give the MySQL dump files in text format to the backup team.

After some search, I found a nice utility named ccrypt (http://ccrypt.sourceforge.net). This utility can be used to encrypt and decrypt files streams. To install ccrypt you can download it from ccrypt site. As I am using Ubuntu (12.04), so in this example I will use apt-get to install it.

image

There are many options of ccrypt, you can read the man page of ccrypt for details.

To create our encrypted backup, first I will create a keyfile, which will contain the key phrase(or key phrase). Encryption and decryption depends on this keyword. Longer and stronger keywords provide better security than short and simple ones. By default, the user who runs ccrypt is prompted to enter the keyword. I will use the -k, --keyfile file option of ccrypt, which instructs ccrypt to read the keyword as first line from the specified file.

Create this keyfile as a hidden file and change the permission of the file, so that only the owner of this file can read and write it.

image 
Type your key phrase in this file.
image

Save this file and change its permissions to 600.

image

Now I will edit the MySQL dump script to enable encryption using ccrypt.

BACKUP_DATE=`date +%k`_`date +%M`_`date +%F`
mysqldump cloud -u pranab -pCl0uD123 | ccrypt -k /root/.backup_keyfile | bzip2 -c > /home/backupadmin/MySQLBackup/bkp_mysql_$BACKUP_DATE.sql.bz2

image

Now lets examine the backup created using this script.

Decompress the file
#bzip2 -d bkp_mysql_10_35_2013-03-11.sql.bz2
Examine the content
#pico bkp_mysql_10_35_2013-03-11.sql

image

Its not readable. That what we wanted Smile .

Now encryption part is over, we have to decrypt the backup so that it can be of some use.

# cat bkp_mysql_10_35_2013-03-11.sql | ccrypt -d -k .backup_keyfile > bkp_mysql.sql

The –d option tells ccrypt to decrypt a file or stream.

Lets examine the decrypted file, yes we can now read the content of the decrypted file.
image

That’s it, simple enough Smile.