In this post I am going to show how to create one machine in Amazon cloud.
I would like to share one experience how it could can be rescuer in emergency. Few years back one online admission project was going on. At that time we did not have our private cloud setup. Suddenly one requirement came that we need to run some live reports. All the servers used at that time were very busy, so running reports on those servers were not possible. We talked to the server hosting provider and they also replied they will need at least 4 to 5 hours to provide the server (because of process they follow). Also they need minimum duration (like 1 month) for which the server will be provided. But our requirement was just for one or two hours. So I decided to take resources from Amazon cloud, withing few minutes servers were ready and we could run the reports and after one and half hour we could release those servers. It was very cost saving and was very very quick and I have the choice as per my requirement. :) so cloud can be very very helpful in certain situations.
Now I will go into the machine creation steps.
Login to AWS Management Console using the link http://aws.amazon.com/

Now we are inside the AWS management console which is the web based GUI for managing our Amazon cloud services. Here our region is Asia Pacific (which is my nearest location); remember to select the appropriate region as our machines will be created in that region. It is better to choose the nearest region as it will reduce the latency. I will stick with Asia Pacific region as it is nearest to my location.

To use Amazon service we must have a named Key Pair (for secured access to the instances that we will create). To create a key pair, click on the Key Pairs link under My Resources.

Now we are in Key Pairs page, click on the Create Key Pair button.

Enter the name for the Key pair and click on Create button. Here I will create a Key Pair named MKCL.

Once the key pair created, it automatically gets downloaded; save it in a safe location as we will need it later.

As we can see the below screenshot that our key pair named MKCL is created. We will use this key pair to create new instances.

We are going to launch a new Windows 2008 server instance. To create an instance we need one Amazon Machine Image (AMI, which is like the ISO image we use to create VMs). We can use the AMIs provided by Amazon, community AMIs shared by different Amazon cloud users or we can create our own AMIs and uploaded in our Amazon account. There are two ways we can find the AMIs in AWS GUI Web Console for our new machine.
First is click on Launch Instance button in the EC2 Dashboard. The Request Instance Wizard will appear and it has three tabs. In the first tab Quick Start we can find the most common AMIs provided by Amazon. In the second table My AMIs we can find our AMIs and in the third tab we can find the AMIs shared by Amazon cloud user community.

We can see the different community AMIs; also we can filter the AMIs as per the options available.

Also we can click on the AMIs link under the IMAGES option at the left side of the screen to find the AMIs. Also we can find AMIs as per availability and choice.

Here I am going to use the Amazon AMI of Windows 2008 server 64bit to create the machine. Click Select to choose the AMI and proceed.

Now we are in Instance Details page, here we have to specify how many machines we are going to create by specifying Number of Instances. Next we have to select the Availability Zone
(each region has different availability zone, an availability zone can be thought of roughly as a data center). Select the Instance Type
(the hardware configuration for our machine). I am going to create Extra Large instance with 8 ECUs (EC2 Compute Unit, One ECU provides the equivalent CPU capacity of a 1.0-1.2 GHz 2007 Opteron or 2007 Xeon processor), 4 Cores and 15GB of Memory.

Select Launch Instance to start the instance, or we can select Request Spot Instance
(Spot Instances let us pay for compute capacity by the hour at a Spot Price that fluctuates based on supply and demand. We specify a maximum price that we are willing to pay per hour, and our instance only runs when the Spot Price is at or below that price). I am going to launch the instance immediately, so I select Launch Instance and click Continue.

We have to specify the Advance option for our instance. Select the Kernel ID (Amazon EC2 provides user selectable kernels which enables us to select a kernel when bundling an AMI or launching an instance), RAM Disk ID (Kernels are most likely to require a RAM disk that contains required drivers. If we launch a kernel without a required RAM disk, it will not work properly). Also we can enable monitoring for our instance, using Amazon CloudWatch service (Amazon CloudWatch is a web service that provides monitoring for AWS cloud resources with additional cost of $0.015 per hour for each Amazon EC2 instance. It monitors resource utilization and performance metrics like CPU utilization, disk reads and writes, and network traffic)

Next we have to select the key pair; we will use the MKCL key pair that we created previously.

We are in Configure Firewall page. Here we can define firewall rules for the instance we are creating. We can use existing Security Group
(it is a named group of firewall rules that we can share between different instances). We are going to create a new security group for my new instance. In the new security group MKCL,
I will allow RDP access to my new machine from all the IPs and HTTP access for everybody. Select the rule and click Add Rule button to add the rule to the security group. Once all the rules are added click on Continue button.

Finally I am in the Review page, here we can see and change the specifications that we provided in the previous steps. If everything is OK, click Launch button to start creating the new instance.

So the instance launching process started. It takes few minutes to ready the instance. Also we can assign EBS volumes to the new instance. I will talk about EBS volumes in my next post. Also we can assign an Elastic IP (Elastic IP addresses are static IP addresses that we can assign to our instance, otherwise the instance gets one dynamic IP address. But remember that if we reserve an Elastic IP and we are not using in any instance, then Amazon charges $0.01 per non-attached Elastic IP address per complete hour) to our instance.

Now if we go to Instances, we can see the new instance. We can see the Instance Id, AMI ID, Root Device, Type of the instance, Current Status of the instance, Lifecycle, Public DNS for the instance. We can use the public DNS of the instance to connect to it.

Now we are going to connect this instance, click on the instance and we will get the menu for Instance Management, Instance Lifecycle and CloudWatch Monitoring. Click on Connect under Instance Management.

Here we can get the information how we can connect to the instance, it depends on the type of the instance. In our case its windows so we can find the information how to connect to our instance using Remote Desktop. Copy the Public DNS of the instance.

To connect through Remote Desktop connection, we need windows username and password. To get that, click on the instance and click on Get Windows Password.

Here we can get the encrypted password for Administrator. To decrypt the password we have to use the private key of the Key Pair that we used while creating the instance. We created a key pair named MKCL and downloaded and saved the private key in our computer and used that key pair to create the instance. Open that key file MKCL.pem using any text editor and copy the content and paste it in the Private Key field. Initially the Decrypt Password button remains disabled. When we paste the private key and click inside the textbox the Decrypt Password button gets enabled. Click on Decrypt Password.

So we get the password and login information for our instance.
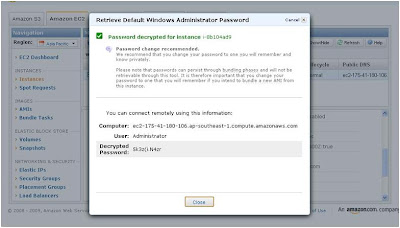
Start remote desktop connection using the Public DNS of the new machine, user name Administrator and with decrypted password…………………………………… Connected…… WOW…………. Hip Hip Hooray …… Within few minutes are in cloud………….

জয় আই অসম,
প্রণব শর্মা
2 comments:
Nice blog.
AWS Training In Hyderabad
AWS Training
AWS Online Training
AWS Training Online
AWS Training In Bangalore
It was a great information. Thanks for sharing.
AWS Training in Hyderabad
Post a Comment