SSL offloading removes the resource intensive SSL encryption/decryption tasks from the web servers to the Netscaler load balancer. SSL offloading ensures the secure delivery of web applications without degrading performance.
Following diagram depicts how SSL requests are handled without SSL offloading:

Now after using SSL offloading the diagram looks like:

Once the SSL traffic is decrypted, it can be processed by any standard service on the Netscaler.
In this document I am going to show how I had implemented SSL offloading for one of our website.
The website has two servers and previously both the servers had the SSL certificates installed in the web server, and load balancer was just forwarding the SSL traffic to both this servers. Now the SSL certificate for the website was about to expire and we renewed our certificate. We received our certificate in mail as shown below:
Our main web server certificate:

As we took the certificate from VeriSign and all SSL Certificates issued by VeriSign after December 11, 2008 will be chained to offline Certificate Authority (CA) roots to align with security best practices. So we also have to use one intermediate CA certificate along with the certificate we received.

Now copy the content of a certificate and open notepad and save it as certificate file.

In my case I have saved the certificates as public.crt for my public key (server certificate) and inter.crt for the intermediate CA certificate.
Login to Netscaler console, go to SSL -> Certificates and click on Add button to add the new server certificate to Netscaler.

The Install Certificate window appears, enter Certificate-Key Pair Name (Certificate key pair consists of private and public key, the certificate we have received from VeriSign is the public key of our server. Also we have a private key for our web server, this private key is to be created before creating the CSR for the server certificate. For details you may refer my older post http://pe-kay.blogspot.com/2011/08/using-digital-certificate-with-apache.html ), in my case I have entered the name SolarexKeyPair.

Select the Public Key, Private Key

Enter the password for the Private Key

Our website certificate is installed, now we have to add the intermediate CA certificate. Click on Add button

Enter the Name in my case I have entered SolarexInter, select the Certificate File Name as the intermediate CA certificate file name. Here no need to select Private Key File Name and enter Password. Click Install to install the Intermediate CA certificate.

Now we have to create the certificate chain i.e. we have to link the Intermediate CA certificate with the server certificate. Click on SolarexKeyPair to select it and right click on it and select Link

Select our Intermediate CA certificate from the list, in our case it is SolarexInter and click on OK.

We can the existing certificate links by clicking the Cert Links button. We can see that SolarexKeyPair is linked to SolarexInter.

Our certificate installation in done, now we have to create a SSL-based virtual server for SSL offloading. This SSL virtual server will intercept encrypted traffic, decrypts it and sends the clear text messages to the HTTP services that are bound to this virtual server. In Netscaler GUI Console go to SSLOffload -> Virtual Servers and click on Add

Enter the name for the virtual server, enter the IP Address, select protocol SSL and port 443. In the Services tab, select the HTTP services which will receive the messages from this virtual server. In my case I have selected the two HTTP services running on each Solarex server. If we already have not created the HTTP services, then first create the HTTP services for this virtual server and then add this virtual server (of course we can add the services later but adding it before is a good practice).

Go to SSL Settings tab, select the server certificate and click on Add. In our case I will add the SolarexKeyPair. Click on Create button to create the virtual server.

Now my virtual server is ready to do SSL offloading.

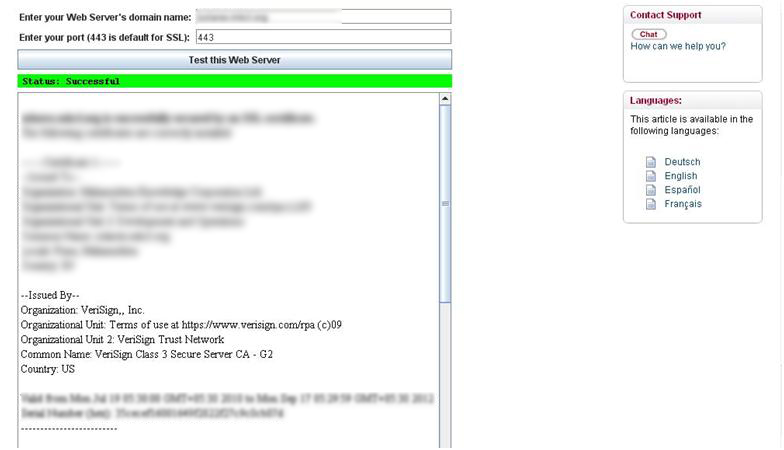
To check whether the SSL chain is working properly we can use the VeriSign website:
https://knowledge.verisign.com/support/ssl-certificates-support/index?page=content&id=AR1130
Enter the name of the website to check, and click on Test this Web Server. If everything is working file we will get the Status as Successful.

Following diagram depicts how SSL requests are handled without SSL offloading:

Now after using SSL offloading the diagram looks like:

Once the SSL traffic is decrypted, it can be processed by any standard service on the Netscaler.
In this document I am going to show how I had implemented SSL offloading for one of our website.
The website has two servers and previously both the servers had the SSL certificates installed in the web server, and load balancer was just forwarding the SSL traffic to both this servers. Now the SSL certificate for the website was about to expire and we renewed our certificate. We received our certificate in mail as shown below:
Our main web server certificate:

As we took the certificate from VeriSign and all SSL Certificates issued by VeriSign after December 11, 2008 will be chained to offline Certificate Authority (CA) roots to align with security best practices. So we also have to use one intermediate CA certificate along with the certificate we received.

Now copy the content of a certificate and open notepad and save it as certificate file.

In my case I have saved the certificates as public.crt for my public key (server certificate) and inter.crt for the intermediate CA certificate.
Login to Netscaler console, go to SSL -> Certificates and click on Add button to add the new server certificate to Netscaler.

The Install Certificate window appears, enter Certificate-Key Pair Name (Certificate key pair consists of private and public key, the certificate we have received from VeriSign is the public key of our server. Also we have a private key for our web server, this private key is to be created before creating the CSR for the server certificate. For details you may refer my older post http://pe-kay.blogspot.com/2011/08/using-digital-certificate-with-apache.html ), in my case I have entered the name SolarexKeyPair.

Select the Public Key, Private Key

Enter the password for the Private Key

Our website certificate is installed, now we have to add the intermediate CA certificate. Click on Add button

Enter the Name in my case I have entered SolarexInter, select the Certificate File Name as the intermediate CA certificate file name. Here no need to select Private Key File Name and enter Password. Click Install to install the Intermediate CA certificate.

Now we have to create the certificate chain i.e. we have to link the Intermediate CA certificate with the server certificate. Click on SolarexKeyPair to select it and right click on it and select Link

Select our Intermediate CA certificate from the list, in our case it is SolarexInter and click on OK.

We can the existing certificate links by clicking the Cert Links button. We can see that SolarexKeyPair is linked to SolarexInter.

Our certificate installation in done, now we have to create a SSL-based virtual server for SSL offloading. This SSL virtual server will intercept encrypted traffic, decrypts it and sends the clear text messages to the HTTP services that are bound to this virtual server. In Netscaler GUI Console go to SSLOffload -> Virtual Servers and click on Add

Enter the name for the virtual server, enter the IP Address, select protocol SSL and port 443. In the Services tab, select the HTTP services which will receive the messages from this virtual server. In my case I have selected the two HTTP services running on each Solarex server. If we already have not created the HTTP services, then first create the HTTP services for this virtual server and then add this virtual server (of course we can add the services later but adding it before is a good practice).

Go to SSL Settings tab, select the server certificate and click on Add. In our case I will add the SolarexKeyPair. Click on Create button to create the virtual server.

Now my virtual server is ready to do SSL offloading.

To check whether the SSL chain is working properly we can use the VeriSign website:
https://knowledge.verisign.com/support/ssl-certificates-support/index?page=content&id=AR1130
Enter the name of the website to check, and click on Test this Web Server. If everything is working file we will get the Status as Successful.
জয় আই অসম,
প্রণব শর্মা
No comments:
Post a Comment