The Partimage is a Linux utility which can be used to save disk partitions into an image file. It only copies the used blocks of a partition. It can also compress the image file with gzip/bzip2 utilities to reduce the image size. It supports many file systems. Following is the list of supported file systems at the time of writing this document (only the stable supports are included in the list):
It can be downloaded from http://www.partimage.org/Download or it can be installed using apt-get
I will show the use of partimage with an example.
Scenario:
One of my machine’s OS crashed and I am unable to repair it, I need the data in the disks of the machine. So I booted the machine with Ubuntu Linux live CD and mounted an USB disk. I will clone the partitions using partimage and I will store the disk images into the USB disk. I will restore the partition images into a different machine.
Example:
I have mounted the USB disk to /media/disk folder.
Before starting Partimage use fdisk command to find the information of the existing partitions in the system
# fdisk –l
Note the name of the partition to be cloned using partimage.
To start PartImage run the command
$ sudo partimage or
if you have login as root
# partimage
Creating Image
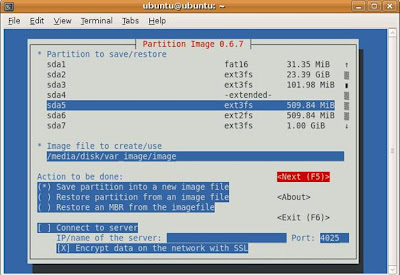
I am going to clone the sda5 partition. Select sda5 partition in the Partition to save/restore list.
Enter the name and location of the image file (I have specified the location in the USB disk) in Image file to create/use.
The name of the image file is specified as image. The file will be created as image.000. I can split the image file into multiple files (this option is in the next screen), in that case the files will be created as image.000, image.001 and so on.
Select Save partition into a new image file in Action to be done
Partimage can save image over the network using the partimage network support, or using Samba / NFS. I am not going to use this feature in this example.

Press F5 to go to the next screen.
Here we can specify the compression level. I am going with the first option i.e. with no compression. If I select None, in that case also only the used blocks will be in the image file. Suppose my partition is 20GB and only 8GB is used, the image file will be around 8GB. Using Gzip and Bzip2 option I can make the file further smaller.
I can use the fsck program to check the partition before creation of the image using the Check partition before saving option.
I can also specify a description of the image, so that in the time of restoration I do not have any confusion in case I have lots of different partition images.
Also I can split the image file into multiple files if my image file is large by specifying the file size. This is especially useful in case I want to write the image files into CD/DVD media.
Press F5 to go to the next screen.
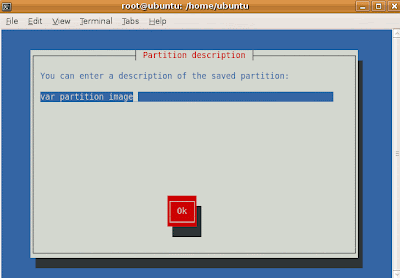
Enter the description of the partition for future reference.
Press OK after entering the description.
Now partimage will check the partition. If it finds any error it will report with a warning message. We can cancel the process here or we can continue with the partition image creation process.
Before starting the partition cloning process partimage will give a summary of the partition.
Press Enter key to start the partition image creation process.
Partition creation process:
Now I will restore an image file in a different machine. Mount the USB disk which contains the image file into the machine. I have mounted the USB disk in /media/usbdisk folder. I will restore the image file into /dev/hda5 partition which is currently mounted in /data folder.
Start partimage with the command
# partimage
Select hda5 partition (in this partition we will restore the image) in Partition to save/restore.
Enter the name and location of the image file (if we have broken the image files into multiple files like image.000, image.001 etc., then enter only the name of the first image file image.000)
Select Restore partition from an image file in Action to be done
Press F5 to go to the next screen.
Always remember to unmount the partition in which we will restore the partition. Otherwise partimage will give the error as shown in the screenshot
Unmount the hda5 partition, also format it to clear all the data in this partition.
After unmounting the partition, start the restoration process again. Select partition, Action to be done and image file and go to the next screen. Partimage will show us the description of the image if we have specified it at the creation of the image file (this will help us to identify the image file properly). If the image is not the correct one, we can exit at this point.
Press Enter to hide the Partition description.
Now we can select some options like simulation of the restoration and erasing free blocks with zero values. Also we can specify what to be done if the restoration is successful.
Press F5 to go to the next screen.
Partimage will show the summery of the partition image that we are going to restore.
Press Enter to continue.
Now partimage will confirm before starting the restoration process. Press Yes to start restoration process.
Restoration process:
After restoration process successfully completed, we will get the statistics of the restoration process.
Press OK to finish the restoration process.
Its done and that's all for 2day.
| Name | Description |
| Ext2fs/Ext3fs | Linux file system |
| Reiser3 | A journalized and powerful file system |
| FAT16/32 | DOS and Old Windows file systems |
| HPFS | IBM OS/2 File System |
| JFS | Journalized File System, from IBM, used on Aix |
| XFS | Journalized File System, used on Irix |
It can be downloaded from http://www.partimage.org/Download or it can be installed using apt-get
Scenario:
One of my machine’s OS crashed and I am unable to repair it, I need the data in the disks of the machine. So I booted the machine with Ubuntu Linux live CD and mounted an USB disk. I will clone the partitions using partimage and I will store the disk images into the USB disk. I will restore the partition images into a different machine.
Example:
I have mounted the USB disk to /media/disk folder.
Before starting Partimage use fdisk command to find the information of the existing partitions in the system
# fdisk –l
Note the name of the partition to be cloned using partimage.
To start PartImage run the command
$ sudo partimage or
if you have login as root
# partimage
Creating Image
I am going to clone the sda5 partition. Select sda5 partition in the Partition to save/restore list.
Enter the name and location of the image file (I have specified the location in the USB disk) in Image file to create/use.
The name of the image file is specified as image. The file will be created as image.000. I can split the image file into multiple files (this option is in the next screen), in that case the files will be created as image.000, image.001 and so on.
Select Save partition into a new image file in Action to be done
Partimage can save image over the network using the partimage network support, or using Samba / NFS. I am not going to use this feature in this example.

Press F5 to go to the next screen.
Here we can specify the compression level. I am going with the first option i.e. with no compression. If I select None, in that case also only the used blocks will be in the image file. Suppose my partition is 20GB and only 8GB is used, the image file will be around 8GB. Using Gzip and Bzip2 option I can make the file further smaller.
I can use the fsck program to check the partition before creation of the image using the Check partition before saving option.
I can also specify a description of the image, so that in the time of restoration I do not have any confusion in case I have lots of different partition images.
Also I can split the image file into multiple files if my image file is large by specifying the file size. This is especially useful in case I want to write the image files into CD/DVD media.
Press F5 to go to the next screen.
Enter the description of the partition for future reference.
Press OK after entering the description.
Now partimage will check the partition. If it finds any error it will report with a warning message. We can cancel the process here or we can continue with the partition image creation process.
Before starting the partition cloning process partimage will give a summary of the partition.
Press Enter key to start the partition image creation process.
Partition creation process:
After partition image is created, partimage will give the statistical information of the process. Press Enter to exit from partimage.
Restoring Image file
Now I will restore an image file in a different machine. Mount the USB disk which contains the image file into the machine. I have mounted the USB disk in /media/usbdisk folder. I will restore the image file into /dev/hda5 partition which is currently mounted in /data folder.
Start partimage with the command
# partimage
Select hda5 partition (in this partition we will restore the image) in Partition to save/restore.
Enter the name and location of the image file (if we have broken the image files into multiple files like image.000, image.001 etc., then enter only the name of the first image file image.000)
Select Restore partition from an image file in Action to be done
Press F5 to go to the next screen.
Always remember to unmount the partition in which we will restore the partition. Otherwise partimage will give the error as shown in the screenshot
Unmount the hda5 partition, also format it to clear all the data in this partition.
After unmounting the partition, start the restoration process again. Select partition, Action to be done and image file and go to the next screen. Partimage will show us the description of the image if we have specified it at the creation of the image file (this will help us to identify the image file properly). If the image is not the correct one, we can exit at this point.
Press Enter to hide the Partition description.
Now we can select some options like simulation of the restoration and erasing free blocks with zero values. Also we can specify what to be done if the restoration is successful.
Press F5 to go to the next screen.
Partimage will show the summery of the partition image that we are going to restore.
Press Enter to continue.
Now partimage will confirm before starting the restoration process. Press Yes to start restoration process.
Restoration process:
After restoration process successfully completed, we will get the statistics of the restoration process.
Press OK to finish the restoration process.
Its done and that's all for 2day.
জয় আই অসম,
প্রণব শর্মা


No comments:
Post a Comment